-
The appearance of the product may differ from the illustrations presented in this manual.
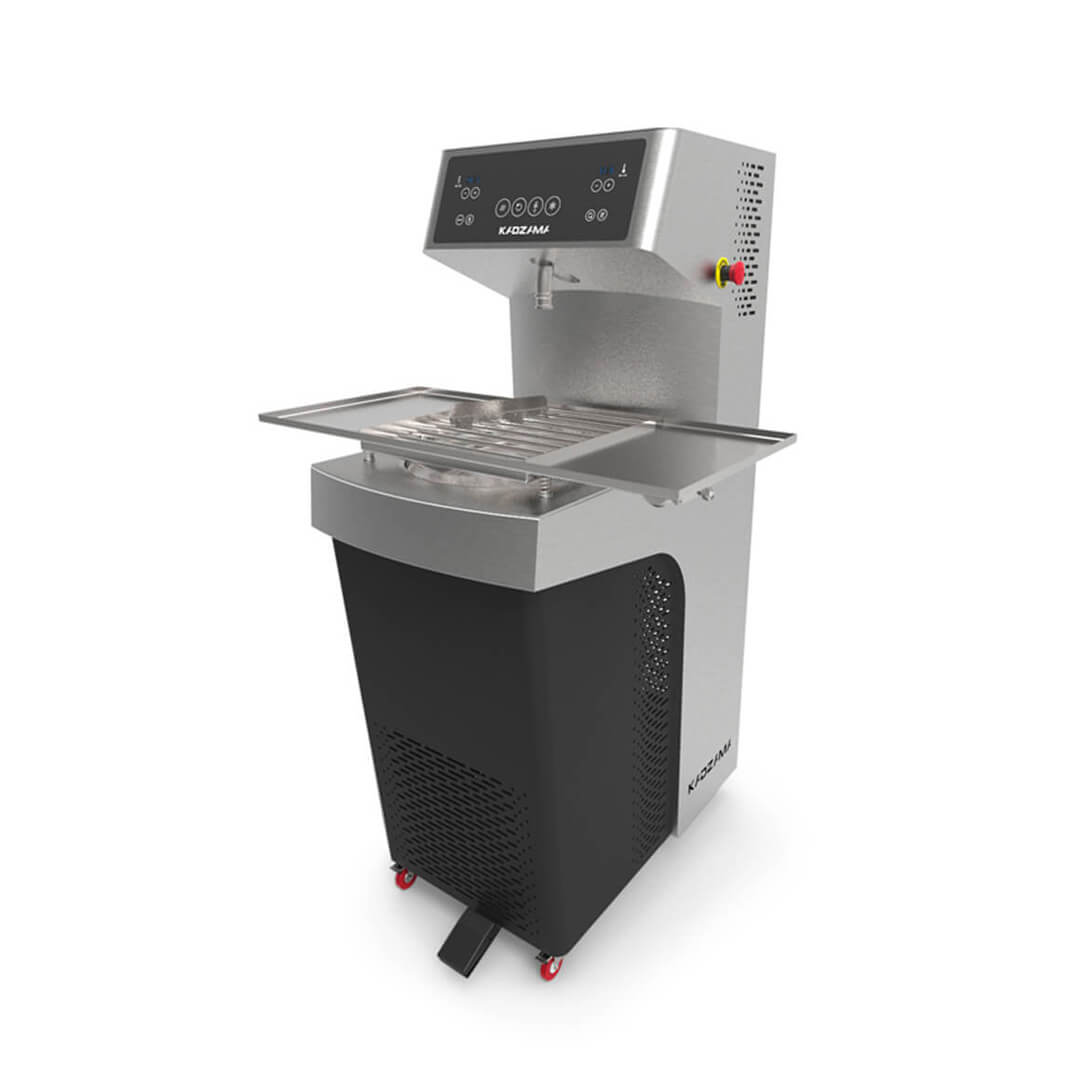
Automatic tempering machine 20 kg
Manual
This manual is designed for study the main technical characteristics, operating principle and rules of technical operation of an automatic tempering machine.
Before use carefully read the instructions below!
Improper use of the equipment can be a source of danger. By starting work with the device you confirm that you are fully acquainted with this manual and understood the rules of operation of the device.
KADZAMA Ltd appreciates your purchase and wishes you a pleasant work experience.
-
Purpose of the device
Automatic tempering machine is designed for tempering chocolate.
-
Specifications
Power supply, [V] / [Hz] 380 / 50 Power intake (not more than), [kW / h] 3,5 Loading capacity, [kg] 20 Productivity, [kg / h] 60 Cooling power, [btu] 7,500 Tempering period, [min] 15 Dimensional size (L x W x H), [mm] 1444 х 475 х 733 Weight (unpackaged / in package), [kg] 175 / 190 -
Configuration
Automatic tempering machine — 1 pc.
Vibrating table — 1 pc.
Manual — 1 pc.
Warranty card — 1 pc.
-
Safety measures
4.1. Automatic tempering machine (hereinafter ATM) is an electric appliance with a certain danger potential. When connecting the device to the electric grid, take all necessary precautions to avoid electric shock.
4.2. An ATM must be connected to the power supply and operated only by trained personnel.
4.3. It is not allowed to operate an ATM in the absence of electrical grounding («E» wire).
4.4. An ATM should be used only for its intended purpose.
4.5. Use and store an ATM in a place out of reach of children
4.6. Do not leave an ATM switched on without supervision for a long time.
4.7. Do not operate an ATM with wet hands.
4.8. Do not allow liquids inside an ATM.
4.9. Do not use an ATM at ambient temperatures below 10˚C and above 40˚C, and relative humidity above 80%.
4.10. When transporting an ATM at sub zero temperatures, prior to first use it should be kept at room temperature for at least 1 hour.
4.11. Any maintenance should be carried out when an ATM is disconnected from the power supply!
4.12. Repair or disassembly of an ATM may only be provided with the assistance of qualified personnel of KADZAMA Ltd.
-
Constructive elements description
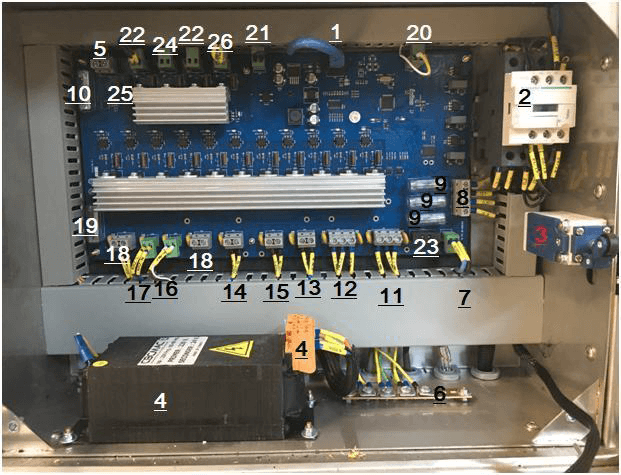
1 Display cable 2 Line contactor 3 End switcher 4 Transformer 230V-24V 5 24V input from transformer 6 Ground wire 7 230V input 8 Contactor power supply 9 Fuses 400V (3 phase) 10 Fuse 230V (1 phase) 11 Mixer engine 12 Pump engine 13 Cooling compressor 14 First tank heater 15 Second tank heater 16 Coolant pump 17 Resistors group 18 Additional output 230V 19 Additional fuse 230V 20 Pedal 21 Lid’s magnetic sensor 22 Additional output 24V 23 Additional fuse 24V 24 Additional output for stream 24V 25 Fuse 24V 26 Fuse 230V 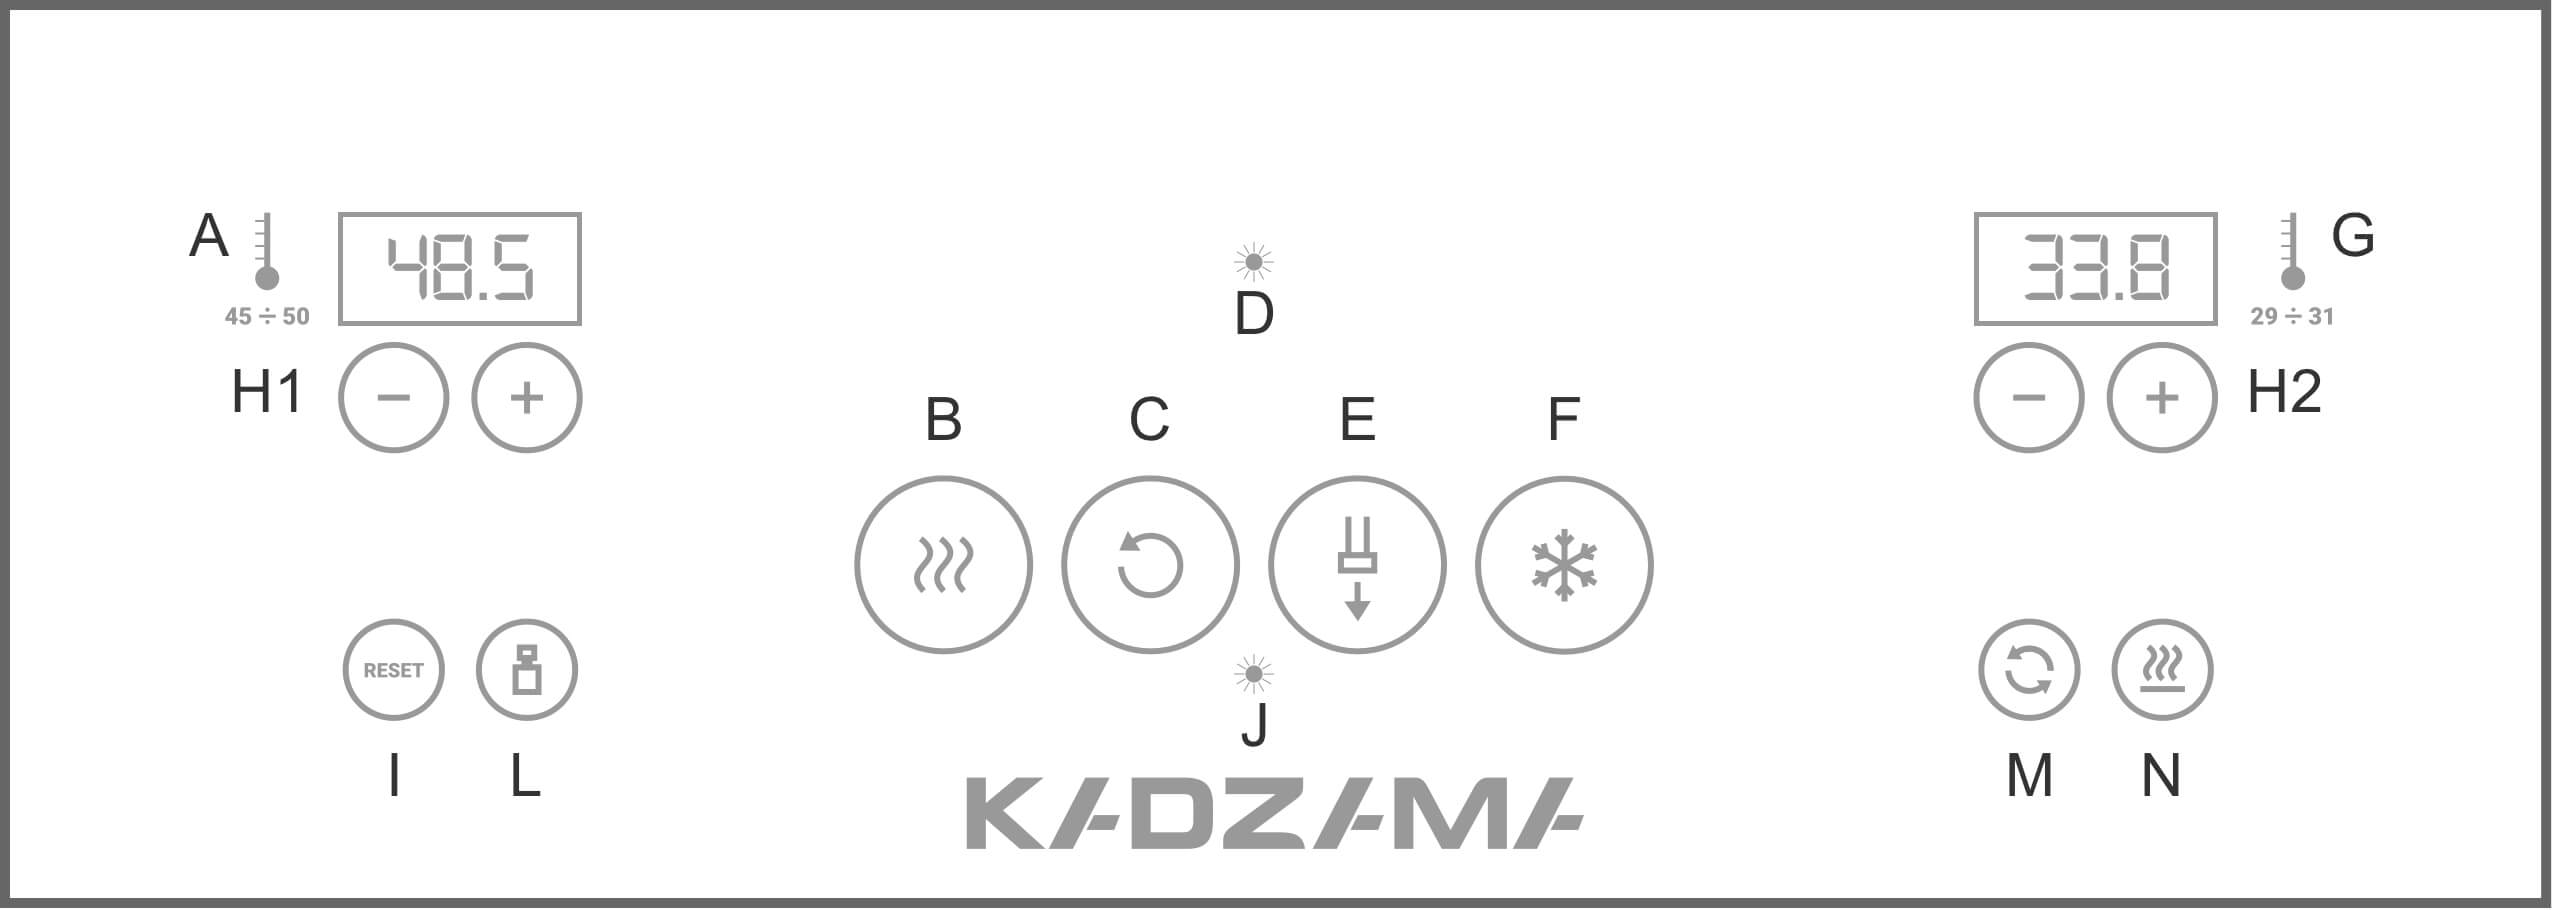
A Tank temperature display B Heat button C Mixer button D Standby indicator E Pump button F Temper button G Outlet temperature display H1 Tank temperature control buttons H2 Outlet temperature control buttons I Reset button L Dispenser settings M Vibrating table button N Vibrating table heat button J Connection signal -
Before start
6.1. Remove the packaging.
6.2. Set an ATM on a flat hard surface, providing easy access to controls.
6.3. Make sure that the distance between the body and the nearest objects is at least 10 cm.
6.4. Connect the power cable to the device and plug it in.
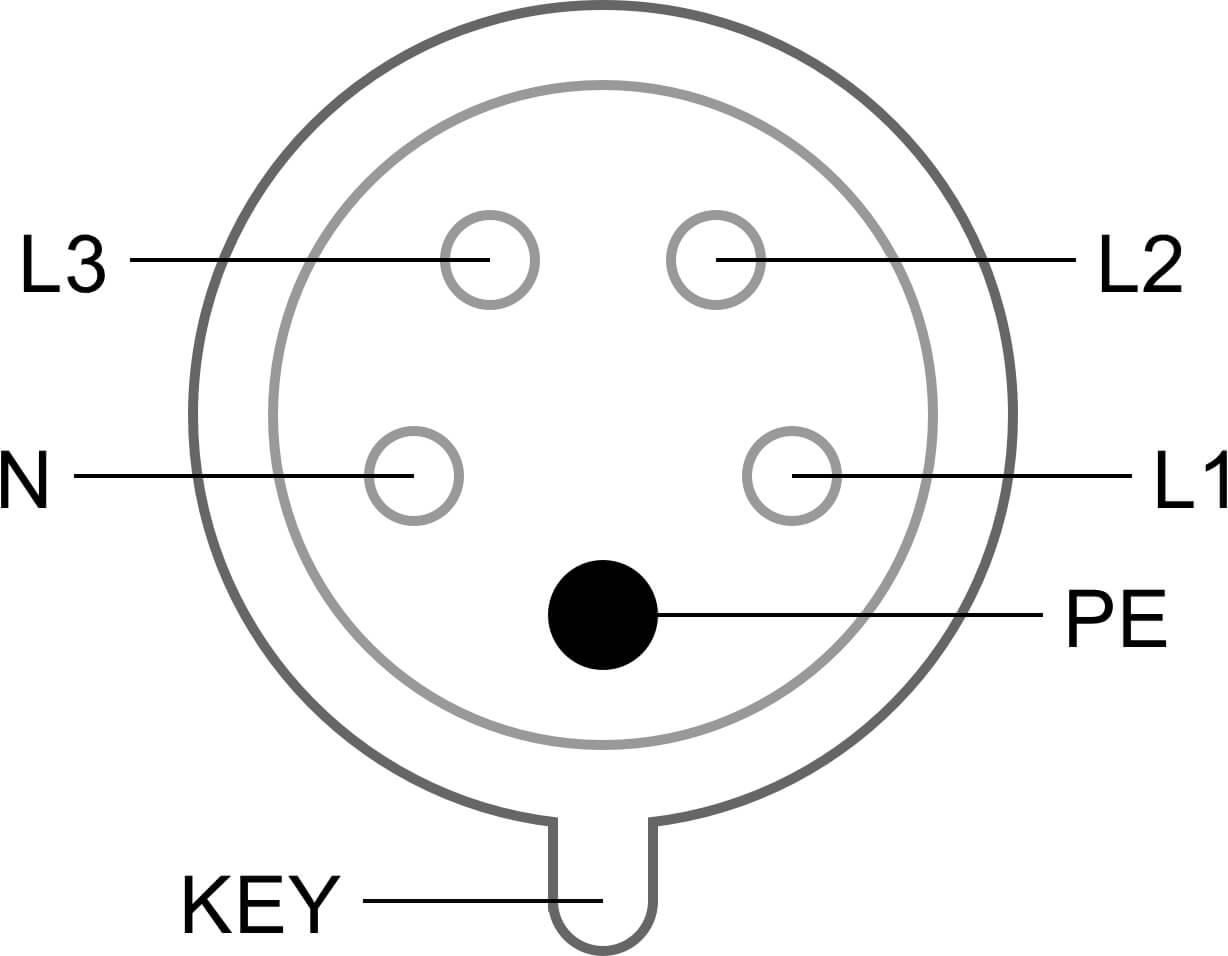
IMPORTANT:
— when connecting, make sure that the phases in the socket are not reversed with zero (with a direct test screwdriver or multimeter). In case of error (Err) on the display, it is necessary to reverse the phases «L1» and «L2» without touching «N» according to the labels on the socket.
-
Exploitation
IMPORTANT! For correct equipment operation it is necessary to maintain a room temperature from 18°C to 25°C. Otherwise, the heating system will show a result higher, than the permissible one (we also draw your attention to the fact that deviation from temperature standards in the room can affect the quality of the product, since in most cases its properties also depend on the environment).
7.1. Remove the protective grid from the tank and put the chocolate in it. Cover the tank.
7.2. Check the state of the emergency stop button (it must not be pushed). The power button on the left side of the machine should light up to indicate that it is ready to start. Press it.
7.3. The Standby indicator (D) will light up to indicate that the machine is ready for work. Press the Heat button (B). The displays (A) and (G) will show the current temperatures of the tank and nozzle, and the heating of the machine units will begin.
7.4. When the temperature on the display (A) reaches the set level, you will hear a signal indicating the ability of starting the mixer. Press the Mixer button (C) to begin mixing the chocolate in the tank. Rotation will not start if the current tank temperature is lower than the set one (the recommended temperature is 45°C). The temperature of the product in the tank can be changed with the Tank temperature control buttons (H1).
7.5. Press the Pump button (E) to start product circulation. The product will flow from the nozzle.
7.6. After starting the mixing and circulation, you can start the tempering process by pressing the Temper button (F). When the temperature on the display (G) reaches the set level, you will hear a signal indicating the product is ready for use. The outlet temperature can be changed using the Outlet temperature control buttons (H2).
Recommended temperatures:
— dark chocolate: 30-31°С
— milk chocolate: 29-30°С
— white chocolate: 28-29°С
These values are for guidance only and should be changed according to the cocoa butter rate in the product. During tempering, no solid product can be added to the tank (only in liquid condition at 45°C).
7.7. ATM is equipped with a dispenser function (dispensing a set amount of product by pressing the pedal). Press the Dispenser settings button (L) to activate this function. On the display (A) the temperature will be replaced with the weight value in grams. You can store up to 15 values in memory. The value of the dispensed dose can be changed with the (H1) buttons with a step of 5 grams.
Keep the button (L) pressed for about 7 seconds (minimum deviation is 1) to change the quantity. When the volumetric dispenser is activated and the pedal is pressed, the machine will stop the dispensing for one second, after that the product will be weighed according to the set data. Continuously pressing the pedal activates fixed pause and jigging cycles.
7.8. The dispenser must be calibrated during the tempering. It is recommended to calibrate the dispenser depending on the specific product, because specific weight may vary. For the right calibration, the tank must be at least 75% full.
Press the Dispenser settings button (L). At the same time press button (I) and keep both buttons pressed for about 5 seconds until display (G) shows:

(light weight)
Keeping the pedal pressed, collect the chocolate poured from the machine with a container. Weigh the unloaded chocolate and enter the net weight of the collected sample on the display (A) by pressing the (H1) buttons. Press the (H2+) button until it displays:

(bigger weight)
Keeping the pedal pressed, collect the chocolate the machine will pour within a few seconds. Weigh the unloaded chocolate and enter the net weight of the collected sample on the display (A) by pressing the (H1) buttons.
Press the (H2+) button until it displays:

Press the (H1) buttons at the same to end the calibration. After calibration, it is recommended to do a checkup:
— press the Dispenser settings button (L);
— select a preset weight by pressing the (H1) buttons and collect the sample to be weighed.
If the net weight of the collected sample does not match the selected preset weight, the calibration must be repeated.
-
Maintenance and care
8.1. During the operation keep an ATM clean.
8.2. It is allowed to wipe the body with a damp cloth, after disconnecting an ATM from the power supply.
8.3. If the power supply is lost during the operating cycle, restart the ATM.
8.4. If user wants to leave chocolate in the tank at the end of the working cycle , it is recommended to do the following:
— if tempering is started: press the (F) button to stop it;
— wait a few minutes until the temperature of the product in the nozzle rises to about 36°C;
— press the following buttons in sequence: (E)→(C)→(B) to switch an ATM to the «Standby» mode (indicator (D) is on);
— An ATM can be turned off by pressing the red button.
8.5. Cover the container with a lid at the end of the working cycle.
Warning messages
ERR PHS Change the connection of phases L1 and L2. Pt1 Err The nozzle sensor has detected a temperature below 12°C or above 60°C. It’s probably damaged and needs to be replaced. Pt2 Err Same as above, but with an auger tube sensor. Pt3 Err Same as above, but with a tank sensor. Pt4 Err Same as above, but with a cooling circuit sensor. Pt5 Err Same as above, but with a duct sensor. Pt6 Err Same as above, but with a second tank sensor. CUC MA Abnormal agitator motor’s power consumption. GUC PA Abnormal product pump motor’s power consumption. GUC 220 Abnormal PS 230V power consumption. GUC 24 Abnormal PS 24V power consumption. GUC FRG Abnormal refrigeration compressor’s power consumption. -
Warranty
The warranty period (as well as the terms of warranty service) are specified in the warranty card.
 Sending...